How to Write a Check: Guide Mastering the Art of Check Writing
Writing a check may seem like an outdated practice in today’s digital world, but it is still a necessary skill to have. Whether you need to pay your rent or make a purchase from a business that only accepts checks, knowing how to write a check is essential. In this comprehensive guide, we will walk you through the step-by-step process of writing a check, ensuring that you have all the necessary information and are equipped with the knowledge to do it correctly.
Section 1: Before Writing the Check
Before you start writing a check, it is important to ensure that you have the necessary funds to cover the payment. Additionally, consider alternative payment methods such as electronic transfers or debit card payments, as they may be more convenient and efficient. However, if writing a check is the best option for your specific situation, follow the steps outlined below.
Section 2: Gathering the Required Information
To begin writing a check, you will need to gather the necessary information. This includes the recipient’s name, the payment amount, and any additional details that need to be included in the memo line.
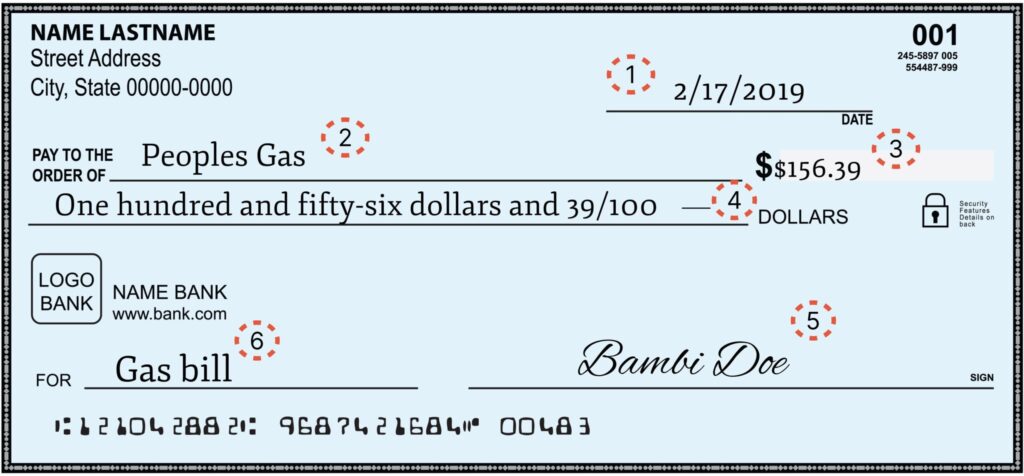
Subsection: Date the Check
Start by writing the current date on the line in the upper right-hand corner of the check. It is important to use the actual date that you are signing the check, as it serves as a legal document.
Subsection: Fill Out the Payee Information
Next, fill out the “Pay to the Order of” line with the name of the person or organization you are paying. Make sure to write the full and accurate name to avoid any confusion. If you are unsure of the exact name, it is best to confirm it before writing the check.
Subsection: Write the Payment Amount in Numbers
In the box on the right side of the check, write the payment amount in numbers. For example, if you are paying $50, write “50.00” in the box. Be sure to include the decimal point and two zeros for cents, even if the amount is a whole number.
Subsection: Write the Payment Amount in Words
On the line below the recipient’s name, write out the payment amount in words. This step is crucial to prevent any alterations or fraud. Start with the dollar amount, followed by the word “dollars.” Then, write the cents as a fraction over 100. For example, if you are paying $50, write “Fifty dollars and 00/100.”
Subsection: Fill in the Memo Line
The memo line is an optional section where you can include additional information about the purpose of the check. For example, if you are paying your rent, you can write “Rent for October.” This section is useful for both you and the recipient to keep track of the payment’s purpose.
Section 3: Signing the Check
The final step in writing a check is signing it. The signature line is located in the bottom right-hand corner of the check. Sign your name legibly and consistently with the signature on file at your bank. This step is crucial, as a check is not valid without a signature.
Section 4: After Writing the Check
After you have written the check, it is important to make a record of the transaction. This will help you keep track of your spending and ensure that you have a clear record of each payment. One way to do this is by using a check register, which can be provided by your bank or created on your own.
Subsection: Using a Check Register
A check register is a tool that allows you to record all the details of each check you write. It typically includes columns for the check number, date, payee, payment amount, and a running balance. By recording this information, you can easily track your expenses and ensure that your bank statement matches your records.
Subsection: Balancing Your Checking Account
Balancing your checking account involves comparing your check register with your bank statement to ensure that they match. This process helps you identify any discrepancies or errors in your account. By regularly balancing your checking account, you can maintain financial accuracy and catch any fraudulent activity.
Section 5: Security Tips for Writing a Check
To protect yourself from fraud and ensure the security of your checks, there are several important security tips to follow. These tips will help prevent unauthorized alterations and protect your banking information.
Subsection: Use a Pen and Dark Ink
When writing a check, always use a pen with dark ink. This prevents others from easily altering the information on the check. Using a pencil or light-colored ink makes it easier for fraudsters to manipulate the check.
Subsection: Fill in Amount Boxes Completely
To prevent alteration or modification of the payment amount, make sure to fill in the amount boxes completely. Start writing the amount as close to the left border as possible and draw a line after the last digit to prevent any additions.
Subsection: Avoid Leaving Blank Spaces
When writing a check, avoid leaving any blank spaces that can be manipulated or filled in by others. If there is unused space after writing the payment amount in words, draw a line to fill the remaining space. This ensures that no one can add extra numbers or alter the check.
Subsection: Sign Checks After Filling Them Out
It is important to sign checks only after you have filled out all the necessary information. Signing a blank check leaves it vulnerable to unauthorized use. By signing the check last, you ensure that all the details are accurate and complete.
Section 6: How to Endorse a Check
In addition to writing a check, you may also need to endorse a check when you receive it. Endorsing a check allows you to cash or deposit it into your bank account. The process of endorsing a check depends on what you intend to do with it.
Subsection: Endorsing a Check for Cash
If you want to cash a check, you will need to endorse it on the back. Simply sign your name on the designated line on the back of the check. Once endorsed, you can present the check to the bank or the issuing institution to receive the cash.
Subsection: Endorsing a Check for Deposit
If you want to deposit a check into your bank account, you will need to endorse it differently. On the back of the check, write “For deposit only” followed by your account number. This ensures that the funds are deposited into your account and cannot be cashed by anyone else.
Section 7: Additional Considerations
While writing a check is a straightforward process, there are a few additional considerations to keep in mind.
Subsection: Ordering More Checks
If you frequently write checks, you may eventually need to order more. Most banks offer free checks when you open a new account, but you can also order checks online through your bank. Be sure to include all the necessary information, such as your account number and contact details.
Subsection: Postdated Checks
Postdating a check means writing a future date on it. However, it is important to note that postdated checks are not legally binding. Banks can choose to cash a postdated check before the designated date, so it is not a foolproof way to control when a check is deposited.
Subsection: Mobile Deposits
Many banks offer the option to deposit checks using their mobile apps. This convenient feature allows you to take photos of the front and back of the check and submit them electronically. However, be sure to check your bank’s specific guidelines for mobile deposits to ensure a smooth process.
Conclusion
Writing a check may seem like a daunting task, but with the right guidance, it can be a simple and efficient way to make payments. By following the step-by-step guide outlined in this article, you can confidently write checks and manage your finances effectively. Remember to prioritize security and record-keeping to protect yourself and maintain accurate financial records.
